Division is one of those things that just saying it gets a negative reaction from most students. But once students have learned division with partial quotients and a toolbox, that all changes. Keep reading if you want to get your students to finally gain some confidence with division!
Why I Love This Method
Before we get into it, here are some reasons why I LOVE this method:
- It helps students understand the connection between division and repeated subtraction.
- Students have a lot of ownership because they get to create the toolbox they use.
- It helps students practice easy multiples like multiplying by 2, 5, 10, and 20.
- It is easy to connect to the standard algorithm once students learn that.
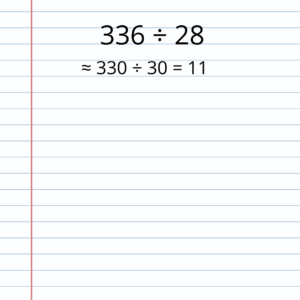
Step 1: Estimate
I always have students start with an estimate. Does it take some extra time? yes. Is it worth it? Yes. If you follow me on Instagram you know I love estimating. It is an important real world skill that deserves to be practiced. It also gives students something to check their answers against.
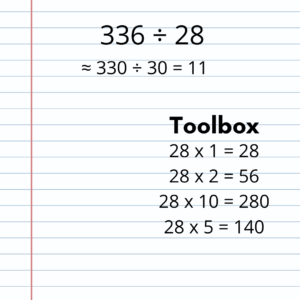
Step 2: Toolbox
The toolbox is the shining star of division with partial quotients and a toolbox. In the toolbox we pick easy numbers that we want to multiply the divisor by. When modeling the toolbox, I start with x1, then x2, then x10. Then we connect that to other multiples. For example, if we know x10, then we can just double it to find x20 and half it to find x5. However, that is not always necessary. Kids can put however many numbers they want in their toolbox! If they only have x1, they could still solve. It would take them a while, but they could do it. Choosing which numbers to use helps them in so many ways! They are practicing their multiplication and also deciding how they can make the process the most efficient. So many skills at once!
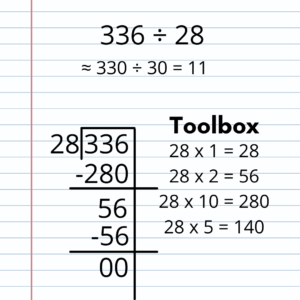
Step 3: Subtracting
Once their toolbox is done, students look at the dividend. Then they look at their toolbox and decide which number they should subtract first. The goal of partial quotients is to subtract until they get to zero so we want to subtract the biggest number possible (without getting into the negatives). But we only use numbers from our toolbox. This is why I love this method. Students are not overwhelmed with where to start because instead of having infinite possibilities they have 2-6 options of what they can subtract because they are using their toolbox.
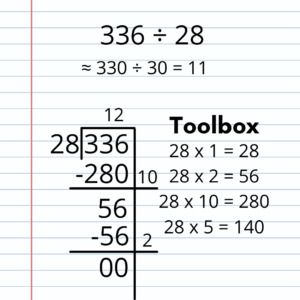
Step 4: Recording the Partial Quotients
Division with partial quotients and a toolbox allows students to make some of their own decisions. It is up to you and your students if you want to do this step after subtracting or at the same time. This is eventually what will lead us to our answer. Every subtraction step goes hand in hand with a partial quotient. Essentially, we are figuring out what we multiplied the divisor by to get the number we subtracted.

Step 5: Adding the Partial Quotients
For our final answer, we want to add all of our partial quotients we used. That will give us our final answer!
Step 6: Check with Your Estimate
Look at your final answer and check it with your estimate. Are they close? Does the answer make sense? Then you are done!
If you want to see the video in action head to this post on my Instagram to see a video. Partial quotients with a toolbox has changed the way my students approach division. They don’t quiver when they hear the word anymore and they are getting practice with so many important skills at the same time!