
Whenever I talk about thin sliced problems, I always get the same two questions: why do you use thin sliced problems and how do you create thin sliced problems? This blog post will dive into everything you need to know about how to create and use thin sliced math problems in your classroom.
What Are Thin Sliced Problems?
Using thin sliced math problems is when you provide students with one problem at a time, and each problem increases in difficulty, but only slightly.
What Do They Look Like?
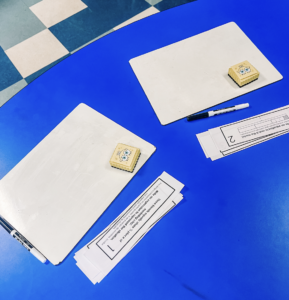
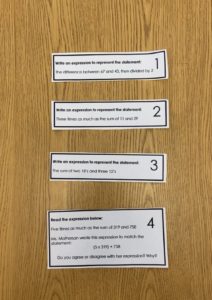
They are quite literally thin sliced pieces of paper. There is one problem per paper. The papers also have numbers on them (1, 2, 3, etc.) so students know which problem to do first, second, etc. There are a lot of ways you can give them to students. You can put them in one bin, give each student a stack of problems, use different colored paper for each problem use different colored bins, and more! When they need problem 2, they put problem 1 back in the bin and get problem 2 out. . Click this link to download a free version of the template that I use when I create my thin sliced problems: Thin Sliced Problem Example
Why Do You Use Thin Sliced Problems?
My students benefited so much from using thin sliced problems last year. I used this strategy at my small group when it was time to practice. Students were able to work by themselves or with a partner. Here are some of the reasons why I loved using them in my small group:
-They solved them on mini white boards. I don’t know what it is about white boards, but students are more likely to try when they know are able to instantly erase a mistake.
– It is self-checking. The answers are on the back, so when students solve a problem on their white board they turn the problem over and check their answer. If they got it correct they move on to the next problem. If they made a mistake they look at the work and try to figure out where they made their mistake.
-Students are able to move at their own pace. If they stay on problem 1 the whole time, that is fine! Problem 1 is meeting the objective. If they move on to problem 2, that is also okay! If they finish all of them, they have gone above and beyond the objective, which is also okay! This meets every students needs without an intense amount of differentiation.
-It decreases the chances of students becoming overwhelmed wit the number of problems they need to do. Students are often given a worksheet with 8+ problems and get anxious. With thin slicing, they are only focusing on one problem.
-Students worked for a set amount of time, not until they finished a certain problem. Once we are done with the mini lesson, exploration, or whatever our small group is doing, I will tell them that they have x minutes to work on their thin sliced problems, and I will send them back when it is time. This way, they are working until it is time to go back, and if they spend the whole time on one problem, that is okay! They are allowed to go back to their tables if they finish all of the problems before I send them back.
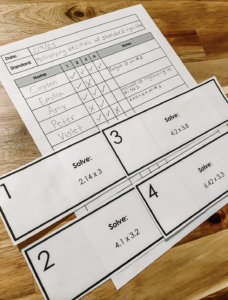
-It allows me to see exactly what a student needs. Each problem increases in difficulty (but only slightly) so it is easy to pinpoint exactly what a student is struggling with if they get stuck on a certain problem or get a certain problem wrong. Click this link to download some free templates of the tracker I use when I am taking notes in my small group about the problems they are completing: Small Group Tracking Templates

Don’t Kids Cheat if the Answers are On the Back?
This question comes up every time, and my answer is always that this has so much to do with the culture of your classroom. When I introduce thin slicing, we talk about how easy it would be to just cheat. Then we talk about why that is not a good idea, and students come up with those reasons on their own. We have this conversation about three times a year, after a holiday break. And it eliminates 99% of the students from cheating. Every once in a while I will have a student who tries. But having a quick conversation about how it is not helping their learning, and how I can’t help them when they are stuck if I think they understand, always fixes the problem.
Where Do You Get the Problems?
My curriculum! More often than not, the practice problems in your curriculum increase slightly in difficulty. You could very easily just print the practice problems, write the answers on the back, number them, and cut them up. I retype them to make the formatting nicer and add numbers, but this is not necessary. There have been times when I make my own as well, or I put in a few extra ones. If you are doing this, my biggest tip would be to make sure that the difficulty level is only slightly increasing with each problem. Sometimes it might not even be noticeable to students because it is so subtle, but that is good! We want them to feel confident because the next problem relates to the previous one they already solved.
What If Students Need More Support?
This is why I love small groups. There are never more than 12ish kids with me. I am monitoring and taking notes while they are working and can easily see when they are stuck. Then support is given when needed. I also make manipualtives a normal part of my classroom. We have decimal disks, fraction bars, and so much more available, and using them is not seen as something bad. It is just a tool, like a pencil, that you might need.
This blog post definitely answered the most popular questions about how to create and use thin sliced math problems. I hope this supports you in using thin sliced problems in your own math classroom! Looking for how to incorporate this into your classroom? Check out this blog post about using math menus! Comment below or email me with any questions!
If you are a 5th grade teacher, you are in luck! I created TWO options that include over a years worth of 5th grade math thin sliced problems:
Option 1: Mini-Course that includes growing bundle of fully editable thin sliced problems, trackers, and videos to help you!
Option 2: Growing bundle of fully editable thin sliced problems and trackers


10 thoughts on “How to Create and Use Thin Sliced Math Problems”
Do you make a few sets of the problem bank? I would think several would need problem 1 at the start or do they share?
Great question! When I make them I print one out, write the answers on the back, and then make 12 copies that I cut up. That way there are 12 copies of each question. If students decide to work in partners they share a problem, if not they can get their own.
Juliana,
Are you able to share the document you use to create your thin-slicing questions? I am treading water right now with a new curriculum (Math in Focus) and using BTC. I received your Bell Ringer activities. I have been using MTM opening questions which seem to take too much time. Any help would be greatly appreciated.
I usually just use the problems in our math curriculum, just reformat them.
How can I obtain a copy of your problems? Are they on TPT?
Unfortunately no. In the past I have just used the problems that are in my curriculum. We do not have a curriculum this year so I make them. I would start with looking at your curriculum. Often times the problems increase slightly in difficulty, which is what we want!
I see this says 5th grade but do you think it’s appropriate for 3rd grade?
Yes, this would absolutely work in 3rd grade!